Monthly Archives: August 2011

Tutorial : RakNet Chat on the iPhone

The purpose of this tutorial is to set up a basic chat client on the iPhone that is able to connect to a chat server running on your computer. Since this tutorial is for the iPhone, I’m going to assume that you’re using a Mac and therefore the example chat server is intended to be run on OS X. We’ll get to that in a minute though.

I’m going to assume you’ve completed the last RakNet tutorial and have compiled RakNet into an iPhone library. We’ll be using that library again here in this tutorial.

The first step is to create a fresh iPhone project. I chose a View-based Application since it’s basic and doesn’t include anything extra:

You can name the project whatever you want, but I’ll be using “RaknetTextClient.”

Once the project is created, the first thing you’ll need to do is add the library to the project as described in the last tutorial. I’ll paraphrase it again here though:

  • To add the library, right-click the Frameworks folder and go to Add>Existing items. Chose your RakNet library.
  • To add the headers, right-click the project and go to Get Info. Scroll down to the Search Paths and add the folder containing your RakNet source to the Header Search Paths variable.

With these items done you’re ready to start adding RakNet code. First, open up AppDelegate.h. We’re going to use this file to control the network updates for RakNet. To do this, we need to add a new NSTimer to the interface and a networkUpdate method. After these changes, I have this:

If you want to copy the code, here are the changes:

NSTimer * mTimer;
-(void) networkUpdate: (NSTimer *) theTimer ;

Since our project is using RakNet, it will need to be able to compile C++ code. To do this, we need to rename our AppDelegate.m file to AppDelegate.mm. This will tell Xcode that it can expect some C++ code in the project.

In the newly renamed file, we also need to make some changes to work with the changes to AppDelegate.h. The first item of business is to add the following line to the method -(BOOL)application: … didFinishLaunchingWithOptions: …

mTimer = [NSTimer scheduledTimerWithTimeInterval: 0.1 target:self selector:@selector(networkUpdate:) userInfo:nil repeats: YES];

This line can go anywhere, but I placed it right before the return YES; line. The next step is to add the networkUpdate method. This can go anywhere in the file, but I put it directly after the method mentioned above. The method looks like:

-(void) networkUpdate: (NSTimer *) theTimer
{
[self.viewController tickClient];
}

That’s all for AppDelegate changes, onto the ViewController modifications. These are a bit more extensive since we’re going to be adding some actual RakNet code. The first set of changes needed are in ViewController.h. Add the following #includes below the existing #includes in the file:

#include "MessageIdentifiers.h"
#include "RakPeerInterface.h"
#include "RakNetStatistics.h"
#include "RakNetTypes.h"
#include "BitStream.h"
#include "PacketLogger.h"
#include <assert.h>
#include <cstdio>
#include <cstring>
#include <stdlib.h>
#include "RakNetTypes.h"
#include "Kbhit.h"
#include <unistd.h>
#include "Gets.h"

After all of the #includes you’ll also need to add  using namespace RakNet; before the @interface declaration. Inside the declaration, add the following variables:

RakPeerInterface *mRakPeer;
SystemAddress mClientID;
Packet* mPacket;
unsigned char mPacketID;
UITextField *mSendText;
UITextView *mTextBox;

The first four are for RakNet, and the last two are for the simple UI we’re going to set up in a bit. We also need to add some methods and properties; these are added after the interface declaration. Add the following:

-(void)appendMessage:(NSString*)message;
-(IBAction)sendMessage;
-(void)tickClient;

@property (nonatomic, retain) IBOutlet UITextField *mSendText;
@property (nonatomic, retain) IBOutlet UITextView *mTextBox;

That’s all for the ViewController header file.

Like the AppDelegate.mm file, we need to rename the ViewController.m file so it has the .mm extension. Inside the file, we first need to add a @synthesize line for our two properties. This goes directly after the @implementation line.

@synthesize mTextBox, mSendText;

Directly after this, I added the following method that was taken straight from RakNet’s chat sample:

unsigned char GetPacketIdentifier(RakNet::Packet *p)
{
	if (p==0)
		return 255;

	if ((unsigned char)p->data[0] == ID_TIMESTAMP)
	{
		RakAssert(p->length > sizeof(RakNet::MessageID) + sizeof(RakNet::Time));
		return (unsigned char) p->data[sizeof(RakNet::MessageID) + sizeof(RakNet::Time)];
	}
	else
		return (unsigned char) p->data[0];
}

This method will be used by the network code to determine what sort of message is being sent. The next code change is in the viewDidLoad method. By default this method is commented out, so uncomment it and then add the following code after [super viewDidLoad]; 

mRakPeer  = RakPeerInterface::GetInstance();
mClientID = UNASSIGNED_SYSTEM_ADDRESS;

SocketDescriptor socketDescriptor(54001,0);
socketDescriptor.socketFamily=AF_INET;

mRakPeer->Startup(8,&socketDescriptor, 1);
mRakPeer->SetOccasionalPing(true);	

ConnectionAttemptResult car = mRakPeer->Connect("192.168.2.17", 54000, "Rumpelstiltskin", (int) strlen("Rumpelstiltskin"));

RakAssert(car==RakNet::CONNECTION_ATTEMPT_STARTED);

You’ll want to change a few things here based on your network configuration. In the Connect() method, the first number is the IP address of the machine that will be running the server and the second number is the port for the server. If you’re only going to run this application on the iPhone simulator, you can use “127.0.0.1” as the IP. If you plan on testing on the device itself you’ll need to use the internal IP of the computer that you plan to use as the server. There are a variety of ways to find this; I got mine by checking the config page for my router. If you’re using AirPort and a WiFi connection it’ll be list on the first page of the AirPort settings, something like “AirPort is connected toand has the IP address 192.168.2.17.” You should be able to keep the port number the same. The “Rumpelstiltskin” is the default password in RakNet and should be left as-is to work with the server application.

Anyways, there are a few more changes that need to be made. Add the following set of methods (it’s a long one):

//Sends a message to the server and appends it to the text view
- (IBAction)sendMessage
{
	NSString* message = [NSString stringWithFormat:@"iPhone: %@",mSendText.text];
	const char* cMessage = [message cStringUsingEncoding:NSASCIIStringEncoding];
	mRakPeer->Send(cMessage, (int) strlen(cMessage)+1, HIGH_PRIORITY, RELIABLE_ORDERED, 0, RakNet::UNASSIGNED_SYSTEM_ADDRESS, true);

	[mSendText setText:@""];
	[self appendMessage:message];
}

//Appends a string to the text view
-(void)appendMessage:(NSString*)message
{
	mTextBox.text = [NSString stringWithFormat:@"%@\n%@", mTextBox.text,message];
}

//Update the network and checks for incoming packets
-(void)tickClient
{
	for (mPacket = mRakPeer->Receive(); mPacket; mRakPeer->DeallocatePacket(mPacket), mPacket=mRakPeer->Receive())
	{
		// We got a packet, get the identifier with our handy function
		mPacketID = GetPacketIdentifier(mPacket);

		// Check if this is a network message packet
		switch (mPacketID)
		{
			case ID_DISCONNECTION_NOTIFICATION:
				// Connection lost normally
				[self appendMessage:@"Disconnected from server."];
				break;
			case ID_ALREADY_CONNECTED:
				[self appendMessage:@"Already connected to server."];
				break;
			case ID_INCOMPATIBLE_PROTOCOL_VERSION:
				[self appendMessage:@"Protocol version error"];
				break;
			case ID_REMOTE_DISCONNECTION_NOTIFICATION:
				[self appendMessage:@"A client disconnected from the server."];
				break;
			case ID_REMOTE_CONNECTION_LOST: 
				[self appendMessage:@"A client lost connection with the server."];
				break;
			case ID_REMOTE_NEW_INCOMING_CONNECTION: 
				[self appendMessage:@"Another client is connecting!"];
				break;
			case ID_CONNECTION_BANNED:
				[self appendMessage:@"You are banned from this server."];
				break;
			case ID_CONNECTION_ATTEMPT_FAILED:
				[self appendMessage:@"Connection failed. "];
				break;
			case ID_NO_FREE_INCOMING_CONNECTIONS:
				[self appendMessage:@"Server is full."];
				break;

			case ID_INVALID_PASSWORD:
				[self appendMessage:@"Invalid password."];
				break;

			case ID_CONNECTION_LOST:
				[self appendMessage:@"Connection lost."];
				break;

			case ID_CONNECTION_REQUEST_ACCEPTED:
				[self appendMessage:@"Connection accepted."];
				break;
			default:
				[self appendMessage:[NSString stringWithCString:(const char*)mPacket->data encoding:NSASCIIStringEncoding]];
				break;
		}
	}
}

There’s only one more change needed to this file and then we’ll build the UI. In the viewDidUnload method, add the following code to cleanup the network:

// Be nice and let the server know we quit.
mRakPeer->Shutdown(300);

// We're done with the network
RakPeerInterface::DestroyInstance(mRakPeer);

That’s all the source code changes we’ll need! Next, open up theViewController.xib file. We need to place 3 items: a UITextView, a UITextField and a UIButton. The UITextView should be connected to the “mTextBox” variable, and then UITextField should connect to the “mSendText” variable. The “sendMessage” method should be connect to the UIButton’s Touch Up event. Here’s the full configuration I used:

Save the .xib, and then compile. At this point you’re ready to test the app, so you’ll need to run some sort of server. I’ve compiled the RakNet sample server as a Mac app, which will work with this iPhone app. You can download the server file here.

Download and launch the server app, and enter “54000” as the port to listen on. You can then run your iPhone app on the simulator or device, and it should connect to the server. A connection message will be displayed in the server window when a client successfully connects. Typing messages in the server window will send the messages to all connected clients, as well typing/sending messages on the iPhone app.

Let me know if there are any issues and I’ll try to help resolve them. I’m going to do put up an example of using RakNet’s ReplicaManager on the iPhone as well, possibly tonight but more likely tomorrow.

T


Tutorial : RakNet for the iPhone

A few people have shown interest in running RakNet on the iPhone, and the term appears at least once a day on my “Search Engine Terms” stats column. I initially planned on just putting up a package containing an Xcode project and a few of the RakNet samples, but I’m not sure how this would work with the license agreement. To be safe, I’ve written a general tutorial here instead of posting any of the RakNet source.

One of the common ways to include an external package on Mac is to use a Framework, however this option is not available for the iPhone. This means that there are only really two ways to get RakNet into an iPhone application: compile it directly as part of the project, or link it as an external library.

The first option is definitely the easiest to set up; all you need to do is copy the RakNet files into your project’s source code directory and then include them in the Xcode project as you would any file. This is the route I initially took in my own integration, but I’ve since switched to using a library. I’m not going to cover this method here as it’s pretty straight forward to use, but if you want to use it and have trouble I’m happy to help.

The second option, the library, generally requires that you setup a second Xcode project specifically for building the RakNet library. It also requires that you compile separate versions for the iPhone Simulator and iPhone Device, since they have different CPU architectures. A helpful comment from Paul Solt on an earlier post showed how these two versions can be compiled into a single library; I’ll cover that here as well.

So, onto the tutorial.

The first step is to open up Xcode and create a new project. From the iOS sub group, you’ll want to select “Library”, and then “Cocoa Touch Static Library”, like so:

Go ahead and create the project. I called my “Test” in the screenshots here, but you’ll probably want to go with something along the lines of “RakNetLibrary.”

The next step is to input the source from RakNet into your new project. Right click the “Classes” folder and go to Add > Existing Files…

In the menu that comes up, navigate to the folder containing the RakNet source code. This doesn’t have to be in your project directory, since we’ll tell Xcode to copy the files over. Select all of the files, but don’t include the “cat” folder. This isn’t needed for most RakNet use cases, and does not compile on OS X as of yet.

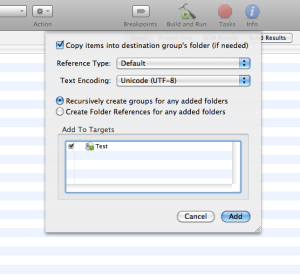
After selecting the files and clicking “Add”, make sure the window that comes up has the following settings:

Once everything is set, click Add.

At this point, you’re ready to compile. Go to the “Build” item on the toolbar and select “Build” from it, or hit command-B. There are a hundred or so warnings that show up, but these aren’t serious and are just from missing #directives and a macro redefinition. It’s possible they’ve been fixed in builds of RakNet after this tutorial was posted.

A commenter, Richard, has pointed out that with the newer versions of Xcode there’s a problem with one of the compiler settings. The problem occurred for him with Xcode 4.2, but if you have trouble with any version of Xcode 4.0+ you might want to check into this. Richard says:

The problem turned out the be the compiler, for previous versions of the SDK the default compiler is “LLVM GCC 4.2” however for the new SDK I guess the default compiler is “Apple LLVM Compiler 3.0”. For whatever reason Apple LLVM Compiler 3.0, cause the errors and many extra warnings.

You’ll want to set your compiler version to GCC 4.2, which is located in the Project settings. To do this, right click the project, select Get Info and scroll down to the section labeled Compiler Version.

After the build is finished a file named “lib.a” will be created. This file is by default in the build/Debug-iphonesimulator/ folder by default, but will depend on what settings you used to build the project.

At this point the library is useable, however you’ll most likely wanted to compile a Device version as well. The device and simulator versions can be combined into a single universal binary using lipo, a tool included on the Mac. Assuming your device library is _d and your simulator library is _s, you can create a universal binary by running the following in Terminal:

lipo -create libTest_d.a libTest_s.a -output libTest_u.a

At this point, the library will be useable for any iOS development you do, whether it be on the simulator or device.

To include the library in an iPhone project, I generally add it to the “Frameworks” folder along with the other Cocoa frameworks. Right click that folder and select Add>Existing Items in the same fashion that you did for the RakNet source files. Since the file is only a library and does not contain any header information, you’ll also need to add references to the RakNet header files. This can be done by adding the RakNet source folder to the header search paths. Right click on the project, and select Get Info. From there, scroll down to the “Search Paths” section and double click the Header Search Paths entry:

Add the folder that contains your RakNet source code to the list, which is most likely empty on a new project. This should be all you need to get going with RakNet!

Since this post has become rather long, I’m going to do a second one tomorrow with some examples of how to actually use RakNet to set up a simple chat client app for the iPhone that can communicate with the RakNet Chat Server example.

T


Rubik’s Cube Map – Part 1

As mentioned in my Chapters post, I’ve recently picked up a new classic 3x3x3 Rubik’s Cube. I’ve relearned a fairly simple solving method that only requires 6 unique move types to complete the entire cube, although it does take a lot longer than more advanced methods. Out of curiosity, I decided to try mapping the entire solving process into a series of images. The most logical way to do this was with a cube map, i.e “unfolding” the cube into 6 connected squares. A solved cube would look something like this:

There were only really two options to go about doing this. Solve it step by step and take 6 photos after each turn, or make a digital model in Blender3D. I chose the latter option, and built a digital Rubik’s cube from 27 unique cube objects. Animating the cube was simple; all I had to do was move the cubes I needed and insert them into new keyframes. I didn’t want any sort of rotational movement in the cube, just changing colors, so the keyframes are all one frame apart.

The first step was to “mess up” the digital cube. I rendered out an animation of this process, which is uploaded here:

http://vimeo.com/28371240

I realized quickly that moving the cube around digitally wasn’t going to be as easy as using the physical cube. To make the process easier, I decided to solve the physical cube simultaneously and make sure the digital model matched. This worked very well, until I messed up on the physical cube and couldn’t undo the error without bringing the two models out of sync. I ended up solving the physical cube completely and then following the steps from the digital cube’s animation to get back to where I needed to be. This was also around the same time when I began to wonder how good of an idea this whole project was. 😛

Eventually I got all 167 frames keyed in, including the scrambling process and a small delay after it. It was already pretty late, so I decided to leave things for the night and do the rendering and compositing today instead.

I ran the rendering process this morning, and I’ve now got a nice stack of 1,002 images that need to be merged into cube maps. Unfortunately I have no idea how to do this, aside from manually making each cube map. The Photoshop batch job system should be able to handle the task, I think, but I don’t know enough about it yet to make it do what I need. I’m looking into this now.

T


Chapters Trip

It’s been a while since I’ve done a post that’s not completely dedicated to my engine project, so this is a nice change. 🙂 At the end of the last school year, I was awarded a Chapters (the Barnes and Nobles of Canada) gift card for being the top in my physics class. I finally got around to spending it today while out buying some other stuff for university.

I wasn’t really sure what type of book to get. I don’t read very often, and since there are still a few fiction books at home I’d like read I decided to look for something non-fiction. I ended up taking a look at the “Computing” section just to see what was there. My expectations weren’t very high, as most general book stores only stock titles like The Complete Guide to OS X Lion, Microsoft Access 101 and, of course, The Internet for Dummies. This Chapters was different.

There was about a third of a shelf devoted to various iOS programming guides, ranging from Cocoa programming to interface design. And surprisingly enough there was an Android section too, which certainly wasn’t small either. I browsed through the entire selection of developer-oriented books and was almost going to go with a book on Perl, but I decided to get a Python 3 book instead.

I’ve used Python 2.x before in the past, but I’ve never sat down and actually learned about the details on the language or how to use it to its potential. Sort of like learning French for two years in a classroom and knowing a few verbs, nouns and adjectives I guess. In either case, I’ve always been a fan of Python and since it has so many practical applications it won’t hurt to become more familiar with it. I will need to add scripting support to my game engine at some point as well, and since I’d most likely have used Python regardless of my Chapter’s trip this will definitely help.

I also bought a new Rubik’s cube, since the book was less than my gift card’s value. I’d like to do some statistics/experiments with different solution patterns, but it’ll have to wait until I can get my solve times down into the sub minute range again. I used to be able to solve a cube in less than a minute back in grade nine, but my cube broke around the end of that year and I haven’t had one since.

I’m off to start reading my new book, so that’s all for now!

T


Dabbling with Deferred

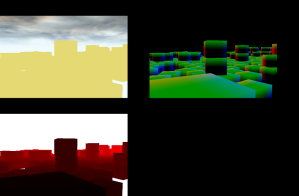
In my last post about the new rendering system, I mentioned that one of my tests involved some basic deferred rendering. I only went as far as splitting the color, position and normals into separate targets, so today I decided to actually do something with them. I looked into some basic lighting equations and wrote a new shader to combine the render output. There are still some artifacts and incorrect spots as I’m not well versed on the topic, but I’m satisfied with my progress.

I ended up including five lights in the test scene: red/magenta, blue, purple, yellow and green. I don’t have a proper lighting system in place so they were simply hardcoded. Here are the results, from the Mac client of course:

This code won’t run on the iPhone, since there isn’t MRT support on it. It is possible to run a form of deferred rendering on the device using a variant of Wolfgang Engel’s method, as pointed out to me by a developer from Supermono Studios. Their team managed to produce a pretty impressive demo of the tech; a video of it can be seen on YouTube. This is another rendering technique I’d like to try at some point, but before that I need to finish the render manager and move the code over into the iPhone build.

T


Render Manager

I started working on implementing a proper render manager today. The scene graph will handle culling and checks to make sure an object should be rendered, at which point it will submit the object to the render manager’s queue. The queue is broken into several groups, such as Sky, Terrain, Mesh, Translucent and a Post based on what the object is. The Sky group, which will contain the skybox itself and any star fields or sun objects, will always be rendered first. Terrain is rendered second, then meshes, then translucent objects and then finally any post effects are applied.

The basic setup is complete, and I’ve all my existing renderable objects over to the new system. The system is designed to be extensible and new groups can be slotted in to suit the needs of the application. To test this out, I added in support for some basic deferred-style rendering that stores depth, color and normals from the scene to a gbuffer and then displays them in the post render group:

Deferred rendering is a feature I’d like to support on capable platforms, so I’m definitely going to be working this more in the future.

T


Mac Client Good to Go!

I finished porting my engine to Mac earlier this morning. Only a small amount of work was required as most of the engine code is already platform agnostic. There were a few iOS-specific calls in the resource manager, such as use of UIImage, but changing them to OS X equivalents wasn’t a big deal. Those areas are in the bug tracker for refactoring though, especially for when the time comes to start putting out Windows versions. The other change was to use GLUT instead of the iPhone’s EAGL to actually display the OpenGL context.

To test things out, I ran an updated Server Build and connected to it with my iPhone, Mac and iPad simulator:

Running the whole simulation locally is also possible, and fully functional. Just one more screenshot for good measure, this time with the physics running on the client:

From here I plan to start working on a Windows client and server build as well. Stay tuned!

T


Ion Engine

I didn’t do any coding today since I’ve been putting a lot of hours into my game engine over the last few days. It’s nice to have  a break some times, after all. 🙂  I’m still aiming for a preliminary demo by Sunday, so I’ll probably start working on a basic UI system tomorrow. In the off time I also though several things I’d like to starting working on, most of which are going to involve some new programming concepts so they’ll probably have to wait. A terrain engine is one of them.

I did start working on a logo today, with one of the names I have in mind:

It’s not final by any means, nor is the name really, but I would like to be able to call my project something. Preferably sooner rather than later, too. I like the name “Ion Engine” since it’s short, catchy and easy to remember. I also can’t find any other active game engines under that name, unlike one of the other names I liked (Axiom). The science nerd in me also got a bit of a laugh out of the fact that my Abstract graphics layer could be stylized as the silver ion Ag+. Ha.

T


RakNet Take Two

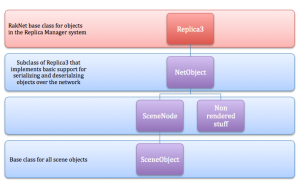
I made my first pass at integrating RakNet into my engine today. I ended up going with the following class inheritance structure for bringing it into the mix:

Red is RakNet and Purple are components of my own engine. So far the only class that actually makes use of the functionality in NetObject is my PhysicsCube that I’ve been using in the last few posts, but it’s very easy to extend any SceneObject derived class to be networkable.

To test out the integration I decided to try running my physics simulation entirely on the server. For ease of use I temporarily forked my codebase into two separate Xcode projects: one for the server and one for the client. All of the rendering code was stripped out of the server build, and physics disabled on the client build. The server handled all the physics simulation and would send updated positions/rotations to the client. In addition to testing RakNet’s basic networking features, the setup also allowed me to use RakNet::Replica’s syncing feature that keeps new clients up to date with the scene as they join. Here are a few shots of the system in action on the iPad simulator:


And one from my iPhone, just as new cubes were added to the scene on the server:

Overall I’m very happy with how RakNet is functioning. In the next few days I’m going to try to get some more interesting things in the scene, as I’m getting a bit tired of the cubes. 😛 I’m hoping to have some basic player-like functionality in place by the end of the week and hopefully a functional Mac and Windows client to go with the iPhone one.

T


Rak ’em Up…

I’m at the point in my engine development where I need to start integrating some net code before I go any further. Like the physics support, networkable objects and net code in general are components I’d like to have as part of the engine’s core functionality rather than tacked on later. I’ve worked with a few network solutions in the past (OpenTNL and RedDwarf), but I decided to use RakNet this time. It’s free to use up to a certain revenue cap, and it’s cross-platform. Perfect!

RakNet only comes with projects for Visual Studio, not Xcode, so I started by loading it onto my desktop machine first. Everything worked out of the box and I was able to run some of the sample use cases without any problems. Setting up Xcode projects for Mac and iPhone were equally straightforward, and I was able to run a chat server on the PC and have my Mac and iPhone connect to it:

I haven’t started to integrate anything into my engine code base yet, but I’m going to start work tomorrow. I did take a look at RakNet’s ReplicaManager though, which sounds extremely useful and will definitely be something I use. It’s essentially a set of classes that will handle replicating objects from the server to the client, or between peers. It’ll be a good foundation for the networked objects in my engine.

All in all, I’m very impressed with RakNet so far.

T